Child Table & Chair Set

Standard

Materials:
Child Table & Chair Set
Black Chalk Spray Paint
Painter’s Tape
CitriStrip
Behr Paint Sample-Dazzling Daffodils (Yellow)
Behr Paint Sample-Lucky Shamrock (Green
Behr Paint Sample- Pumpkin Patch (Orange)
Behr Paint Quart-Silver Color
Medium Paint Brush
Small Paint Brush


Chevron Table before     After pic After pic chair and table set

I was in the market to purchase a table and chair set for my toddler son. I saw a ton of options but I wanted something all wood and that would be able to take a beating. I also wanted something multifunctional. I saw a great idea from Pinterest. A woman purchased a child table and chair set at a flea market and decided to paint the set of course but also to paint the table top with chalk paint. She painted the chairs with a cute stripe design. That was all the inspiration I needed…I so love Pinterest!!! I went to one of my favorite consignment shops, Phantastic Phinds and purchased a darling child table and chair set. It was of course all wood, vintage and made in Germany. It is perfect!  I decided to paint the table and chairs a gray/silver color and  spray paint chalk paint on the tabletop. For the chairs I wanted something fun and colorful so I decided to manually paint different color chevrons on the seats of the chairs.  I have to be honest at first I got Citristip to strip the white paint off of the chairs and table. I was going to strip it down to the bare wood and put a gray stain on the table and chairs. Needless to say, the Citristrip is green friendly and its a good product but it took me forever to take the white paint off of the tabletop so I decided to just paint the entire table and chair set a gray/silver color.

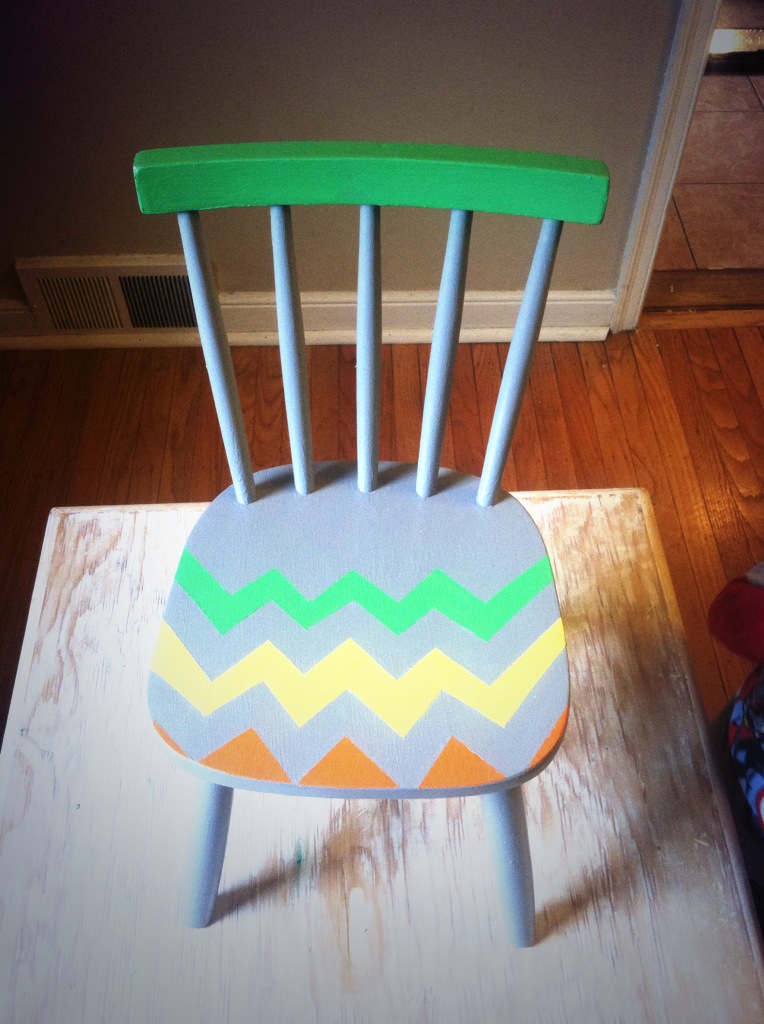
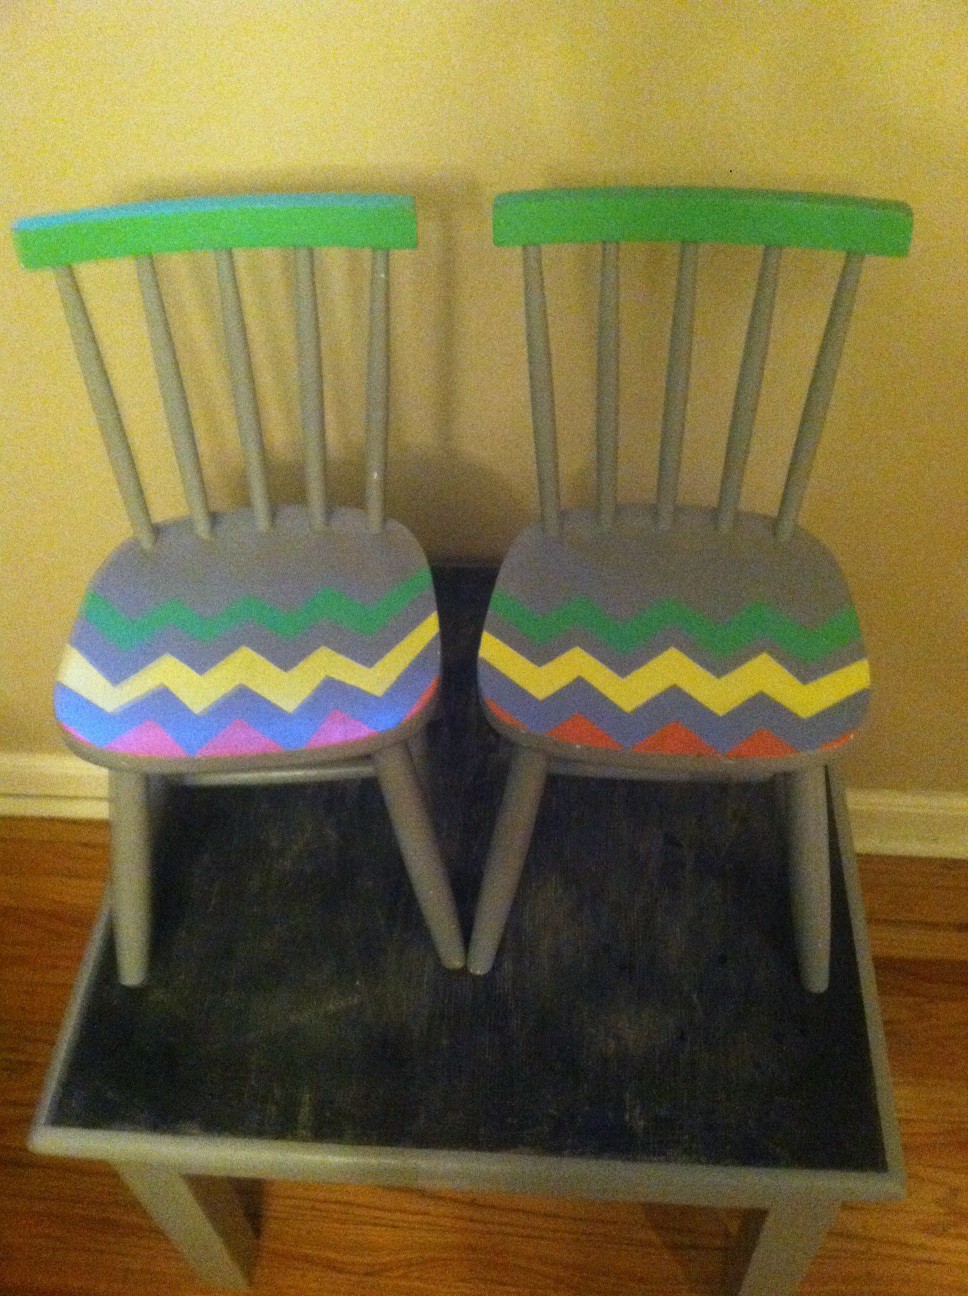
After painting the table, (I didn’t paint the table top) I spray painted the table top with chalk spray paint.  I painted the chairs gray.  I made sure the chairs were fully dry,  I got out my painter’s tape and made chevrons on the seats of the chairs. This part for me was the trickiest because I was trying to make sure that both chairs were identical. If I ever did this project again, I definitely would use stencils. When the chairs were done, I found myself retouching them to make sure  they were the same. Using stencils would probably have elimiated a bunch of retouching.

In the end, I was thrilled with the end product and my son was too…. 😉


Nia Junkie


Window Trim and Crown Molding

Standard

crown molding and window trim

 Tools and materials:

Miter saw

Nail gun

Ruler

Measure tape

Crown Molding “Pro Pack” found at Home Depot®

Window Trim “Pro Pack” found at Home Depot®

Scrap wood (this was actually bead board cut in to 3” wide strips)

BEHR® Premium Plus  Ultra Stain Blocking Paint and Primer in one (Ultra-Pure White, Semi-gloss)

DAP® Spackling Paste

DAP® Fast Dry Acrylic Caulk plus Silicone


I had recently finished painting my daughter’s room “sonic silver” (by BEHR), set up her new bed and dresser, but something was missing… I thought her room would have a more elegant and finished look by framing out the windows and adding crown molding.

 I had never done this before but with some internet research and some help from the workers at Home Depot, I thought I could handle it (plus my dad was coming to town).

 I used “Pro Packs” from Home Depot for both the Crown Molding and the window trim. I also had to get some wood for the inside of the window (we’re the wall comes out from the window). I was able to use scrap wood for that part of the window.

 We started with the windows; took all our measurements and then, came the power tools… dun,dun,dunnnn! My dad brought a miter saw; I left the sawing up to him for this round (next room I tackle, I’m going to be brave and give it a shot). After we cut everything, we painted all the pieces. The Pro Pack was already primed, so I just did two coats on those, but the scrap wood needed that extra coat of paint.  The scrap wood I used for inside the windows was actually bead board cut into 3” wide strips (I painted the flat surface, the wrong side of the bead board).

 After the paint dried, we started to trim the windows. First the inside with the scrap wood, we nailed that all around. Then, we placed the trim around the window, making sure our corners met. At this point you still see all your flaws; the nail holes, any gaps, but no worries… I used spackling paste to fill in the nail holes and caulk to fill in the gaps. Once everything dried, I painted over we’re I spackled (I actually ended up painting a whole other coat for a clean finish).

 For the crown molding, we did all the same steps, beginning to end. It was just a bit more difficult because of the size of the pieces of wood we were cutting and putting up. You definitely need two people for this kind of project. We ran into more issues putting up the crown molding as compared to installing the window trim. It was a lot harder to get the corners right, so there was some time wasted going back and forth to the saw. We also thought we made a huge mistake with the angle.  We cut everything, but it was just the way we angled it on the wall/ceiling. To make this mistake proof, we used 2 smaller pieces of molding cut at 45 degree angles (about 12″ long each), placed them in the corners to make two perfect mitered corners and marked the wall and ceiling so it was easier to place the large pieces.

 It looks awesome! What a difference trim on a window and crown molding can make in a room. The grey walls with the white trim really pops!  This is a pretty cheap way to add a lot value to your home.

 Jamie Junkie


Gold Leaf Paper Mâché Bowls

Standard

20140203-214643.jpg

Materials:

Gold Leaf Paper
Newspaper
Matte Modge Podge
Balloons
Gold Leaf Adhesive
Gold Leaf Sealer
Paint Brush
Foam Paintbrush
Scissors
Acrylic Paint

I thought this was a good DIY/craft for Valentine’s Day, whether you are boycotting Valentine’s day or cleaning your favorite Valentine’s day sweater, you know the one with the red and silver felt hearts. 😉 Anyway I really enjoyed making the gold leaf paper mâché bowls. The results were beautiful and the possibilities are endless. They make great catch alls for jewelry, keys, affirmations, bobby pins…etc. I can even picture them in different sizes on top of a fireplace or even in shadow boxes displayed as art.

To create the gold leaf paper mâché bowls, you need to first make newspaper strips. Next you need to choose what size bowl you want, this would determine the size of your balloon. After blowing up the balloon, take the foam paint brush and apply modge podge to the balloon to adhere the newspaper to the balloon. Be generous with the modge podge and applying the newspaper strips. You are making a bowl, so think thick. Take you time and have fun. Patience is everything with this project. After applying enough layers, put your balloon aside to let it dry overnight.

20140203-223740.jpg

Can you tell I like to create different picture effects…lol.

The next day pop the balloon. You should be left with a bowl with imperfect edges. I personally liked the imperfect edges. Use your scissors to trim the bowl down to your liking. Paint the bowl whatever color of your choice with acrylic paint. Paint it inside and out. Let it dry. Then get excited because the real fun begins…..applying the gold leaf paper. First thing first, apply the gold leaf adhesive with a paint brush or the foam paint brush. A little bit goes a long way, so don’t over do it. Put the bowl aside for about 15 mins until the inside of the bowl feels tacky and the adhesive is no longer white. Then place the gold leaf inside the bowl securing it to the adhesive. Don’t worry about overlapping, be gentle and use a soft paintbrush to remove excess. After applying the gold leaf paper and the inside of the bowl is smooth, apply a layer of the gold leaf sealer and let dry.
You did it!! You now have a beautiful gold leaf paper mâché bowl.

Nia Junkie

Book Review-Quick and Easy Paint Transformations 50 step by step ways to makeover your home for next to nothing by Annie Sloan

Standard

Annie sloan bookMy first encounter with Annie Sloan’s chalk paint was magical. I used it to paint an old maple dresser for my daughter. The details of that project is in a prior blog entry. The texture of this particular chalk paint is so decandent and smooth that painting with it is effortless. Annie Sloan’s chalk paint gives the novice painter confidence. I’ve always been impressed with transformations using this paint, so much so that I felt  compelled to get Annie Sloan’s book, Quick and Easy Paint Transformation 50 ways to Makeover your Home for next to nothing. I did my research and I knew that you could use Annie Sloan’s chalk paint for just about anything including of course furniture, cabinets, fabric, leather and so much more. Therefore I was so psyched to get more knowledge about Annie Sloan’s chalk paint.

hutchchalk_paint_display_1blue dresser

These are just some of the examples I came across on the web of Annie Sloan’s chalk paint beauties!!

Vintage Maple Dresser

This is just one of my furniture transformation (my daughter’s dresser) using Annie Sloan’s chalk paint. There will be many more to come in the near future…;-)!

What I adored about this book was I found it personable and simple. It was a very easy read. It gave advice about choosing paint colors and what furniture to possibly choose for your next project. It gave information about painting tools and materials. In regards to techniques this book had a little something for everyone from aging/distressing, to crackling, gilding and decoupaging. Each paint project displayed in the book had to the point directions with pictures and needed materials. I was so inspired by them all but my favorite was the paint project where brass leaf was applied to the carved detail in a trumeau mirror. The transformation was stunning. I would recommend this book to anyone and everyone who is interested in changing their surrondings with a top notch chalk paint that won’t disappoint! Good read!!p>

painted-fabric-chair-b-a

I fell in love with this chair’s new look! The chair now has a French appeal to it and it was painted with Annie Sloan’s chalk paint and the design was achieved with stencils. This chair is major greatness!! I actually saw this while researching, I just had to share.

Gold leaf Victorian mirror

This trumeau mirror isn’t identical to the one in the book but I wanted to give a general idea of the gold leaf used on the ornate details of the mirror.

Chalk-Paint-Color-Chart

Yummy colors!!!

Nia Junkie

Antique Vanity Circa 1920s

Video

Antique Vanity 1920s

As a teenie bopper, I can remember logging hours sitting at my brass vanity. I was either doing my hair or on the phone. It was one of those gifts that I received from my mother that I don’t quite remember asking for but I adored nonetheless. Unfortunately my brass vanity has went to furniture heaven or maybe the local Salvation Army. Today I can’t imagine not having a vanity in my room. I just think it should be a staple piece in any woman’s room. I say this too for the woman who is the minimalist or the glamour diva junkies. Every woman deserves a place to pamper herself and admire the image looking back at her. We can’t all be like Faye Dunaway in that first scene of Mommie Dearest with the walk in closet, endless shoes, and clothes but just a little touch of fabulous is so necessary. 😉 Check out the first scene of Mommie Dearest.

With that being stated, I searched high and low for my vintage/antique vanity. I got totally fixated on vanities. My obsession led me to Ebay, etsy and consignment shops. I spent hours on Pinterest, fascinated with the plethora of pics of vintage/antique vanities. I was particularly impressed with the vintage desks turned into vanities. I loved the whole repurposing concept.

vintage vanity

vanity5

After searching for weeks, I tried Craigslist and fell in love with this 1920s vanity. Imagine the history of this wonderful antique vanity. If it could talk I wonder what stories it would disclose to me. I snagged it from a retired doctor in Chestnut Hill. He was a kind man and the vanity belonged to his cousin who had since passed away. After negotiating the price, I got it for a steal, a penny compared to its true worth.

my vintage vanity

Now on to the fun part…..to paint or not to paint…..I’m in love with Annie Sloan’s chalk paint color, Florence.

florence swatches

What are your thoughts???

Nia Junkie

Metal Stool by Lyon Metal Products

Standard

Metal Stool by Lyon Metal Products:

before stool

after stool

Tools/materials:

Citristrip® stripping gel

Metal scrapper

Sand paper

Wire brush

CLR

Rust-Oleum® Clean Metal Primer

Rust-Oleum® Painter’s Touch Ultra Cover, Gloss Purple

1/4 inch thick plywood

Hand saw

Paint brushes (for the stain and finish)

MINWAX® Dark Walnut wood finish stain

MINWAX® Fast-Drying Polyurethane, in clear semi-gloss

Clamps (to keep shelves in place while glue dries)

LOCTITE® All Purpose GO2 Glue


I found this old metal stool at a garage sale in W. Pittston, PA for $3.  It was a mess, but I knew it had potential, and for $3, it was silly not to try to improve it.  I stripped the paint (the many layers of paint) to see what condition the metal was in underneath.  It was pretty rusty, but I was able to make out that it was a “Lyon Metal Product;” these stools can be quite pricey new.

I stripped the pain with Citristrip®. There was a lot of rust, I used sand paper, a wire brush, and CLR to get off the rust.  I must admit, I wasn’t able to get rid of all of the rust.  Because I couldn’t get all the rust I thought I would need to prime the chair before I chose a color to spray paint.  I used Rust-Oleum® Clean Metal Primer, two coats, sanding with 220 sand paper between coats.  Then I went with Rust-Oleum® Painter’s Touch Ultra Cover, Gloss Purple, three coats, sanding with 220 sand paper between coats.  It was looking awesome, and I could of stopped there… but… I didn’t…

I had a plan for this chair to be more of a decorative piece of furniture, rather than a chair.  I wanted something with shelves for my daughter’s books.  So I shelved out the foot rails. I used a 1/4 inch thick piece of plywood so I would be able to use a hand saw because I don’t have any “real” power tools (yet).  I took the measurements, and started sawing away.  I found that I had to cut the corners off to get the shelf to fit under the foot rails (because the legs tapper).  I stained the shelves with MINWAX® Dark Walnut wood finish stain, two coats, sanding with 220 sand paper between coats.  Then I used MINWAX® Fast-Drying Polyurethane, in clear semi-gloss, two coats, sanding with 220 sand paper between coats. The shelved were then fit into place snuggly.  I just reinforced them with LOCTITE® All Purpose GO2 Glue. 

There you have it, a cool functional piece of furniture that can go just about anywhere!

Jamie Junkie

The Media Center

Standard

Media center-beforeMedia center-after

The Media Center:


Tools/materials:

Citristrip stripping gel

Paint brushes (for the stripping gel, stain, and polyurethane)

Old tin can or bucket (to pour the stripping gel in)

Metal scraper

Wood filler

Sand paper (100 to 220, use 220 at the end)

Steel wool (000)

Tack cloth (wipes off dust from sanding)

Drill (with a hole saw attachment)                                                     

Screw driver

Rust-oleum wood stain (color-weathered gray)

Rust-oleum Polyurethane, matte interior


Ok… I came across this (soon to be lovely) piece of furniture in my father-in-law’s office.  He was getting rid of it, so once again, I snagged it.  I knew it was good quality, it weighed a ton and it was all solid wood, but the color and hardware had to go.  I stripped it down to see what was under the deep mahogany stain with Citristrip (I did this twice, some spots a 3rd time depending if it was needed).  I’m still not sure what type of wood it was, but I liked it and I wanted to be able to see the grain a bit in the end.  After lots of sanding I decided to go gray. 

I used Rust-oleum’s, weathered gray, wood stain.  I applied the first coat let it sit for about 5 min and wiped it off.  I did 3 coats, and 1 extra coat on the drawers because the wood was a slightly different color.  I had to fill the old pull holes with wood filler, which was so easy; just squeeze the little tube in the holes, scrap off the excess, and sand.  I probably should have done this right after stripping the piece, but I’m new at this… I put that last coat of stain on so it covered up the holes pretty good; it also helped that I picked pulls that would mask the old holes anyway.

After staining the piece, then came the varnish.  I wanted a matte finish, so I used Rust-oleum’s, matte interior, Ultimate Polyurethane.  I put 3 coats on the entire piece, sanding it with “000” steel wool in between coats, and 1 extra coat on the top for extra protection.

I looked everywhere for new hardware for the drawers, but the ones I fell in love with were from Restoration Hardware, Duluth pulls, oil rubbed bronze.  They were a bit pricey, but no worries when I spent so little on everything else.  I used a drill to start the holes for the new pulls and then just screwed them in.  The last thing I did was put a hole in the center back of the piece above the shelf so I could use this as a media center.  I borrowed a drill bit from my brother-in-law, that’s used for door knobs (something else I should have done earlier).

I couldn’t be happier with the end product.  I took this old-fashioned looking office piece and made it into a modern, handsome, media center.

Jamie Junkie

Dollies on Canvas

Standard

Dollies on Canvas

Materials:

Canvas

Dollies

Spray Paint- Rust-oleum Specialty Metallic Gold and Rust-oleum Painter’s Touch Satin Green and Satin Lagoon.

Craft paint (Gray)

Paint Brush

I was inspired. I saw in HGTV magazine how they painted a canvas with craft paint. Then took dollies dyed them with various RIT dye colors and used spray adhesive to adhere the dollies onto the canvas. It was a cool idea but I wanted to go in another direction. I took a canvas painted it with two coats of gray craft paint. Then I took the dollies and situated them in various ways on the canvas and spray painted the dollies three different colors. I used Rust-oleum Specialty Metallic Gold spray paint and Rust-oleum Painter’s Touch Satin Green spray paint and Satin Lagoon spray paint. I really liked these choice of colors because against the masculine gray canvas they really popped but they weren’t too ultra feminine.

20130915-210819.jpg

Nia Junkie

Excursion to Material Culture

Standard

I’m always amazed at the wealth of hidden treasures tucked away in Philadelphia. My blog partner, Jamie Junkie took me for the first time to Material Culture back in August. Material Culture is a global fusion of art from around the world, antique furnishings and decorative art, antique carpets and textiles, vintage couture and accessories, fine books and manuscripts and fine jewelry, silver and timepieces. I was so in awe with everything about this place that I decided to go back and blog about my personal excursion. Upon entering Material Culture, I felt like I was engulfed with the smell of soft incense and there were these beautifully well crafted tables and chairs. Coming soon they are going to also have a small cafe that is located right when you enter on the right side. When I walked in further, I became like a deer in headlights I couldn’t stop staring at these Moroccan lights and copper tables. There were so many various colors of the Moroccan lights that I couldn’t choose just one.

20130915-211846.jpg

20130915-213942.jpg

Once I had my moment with the lights, I walked in further and felt like I was visiting different continents.

20130915-214702.jpg

The rain stick was first believed to be used by the Aztecs to bring forth rain. A rain stick is classified as a percussion instrument. It makes the same sound as maracas.

20130915-215047.jpg

Another pic of the lights but this time I was thinking that the gates in these pics could be repurposed as headboards.

20130915-215531.jpg

Wall of ceramics

20130915-221109.jpg

Copper pots and table top

20130915-221845.jpg

20130915-221908.jpg

I snagged this vintage Chinese calligraphy brush. I always wanted one. It was a steal.

20130915-225844.jpg

This display made me feel as if I was walking into Bombay…;-)

20130915-222456.jpg

20130915-222511.jpg

20130915-222525.jpg

I came across these tiles that would look great set in a table.

20130915-225844.jpg

20130915-230312.jpg

This vase would be perfect just about anywhere in a home. The intricate detail and color is divine.

20130915-225503.jpg

Instead of a bowl full of balls as home decor why not this bowl with a surprise in the middle. It’s so unexpected.

20130915-224244.jpg

Paintings

20130915-225141.jpg

20130915-225204.jpg

This pic is by far my favorite piece at Material Culture. I was transformed into my inner child self. My imagination took me to a palace where I of course was a princess and this was in my bedroom. Don’t judge me…;-)

20130915-223720.jpg

My excursion to Material Culture was very gratifying. It was beyond what I expected to say the least. It is a place that has something to please anyone’s palette. I know I will find myself there several times. Material Culture is located at 4700 Wissahickon Ave. #101, Philadelphia, PA.

Nia Junkie

Mirror Mirror on the Wall and Hair Thingamajiggas

Standard

Chevron Framed Mirror

Materials:

Wood Framed Mirror

Painter’s tape (Blue tape or green (Froggie tape)

Rustoleum Metallic Gold Spray Paint

This blog post is for anyone that is itching to change their home surroundings. My advice is to first start with the things that are in your home. You are more than likely surrounded by jewels. That old bench might just need a new fabric on the seat cushion and spray paint on the legs. This is an easy and cheap modification. Another good tidbit is to go to open houses, sometimes they are staged well and can offer good inspiration. On Labor Day, I took a look around my house and noticed this old wood framed mirror. It is located at the top of my stairs above this upholstered rot iron bench. It is in immaculate condition. I thought to myself this wood framed mirror would rock with chevrons. So I took it off the nail and I got my scotch tape ( you can use painter’s tape) and I started creating chevrons. After I created all of my chevrons around the frame, I covered the actual mirror part. Next I put the wood framed mirror on the drop cloth and I grabbed out my metallic gold spray paint and sprayed away! I did one coat let it dry for thirty minutes and then I applied another coat of spray paint. When the second coat was completely dried, I took off all of the scotch tape and I had funky chevrons on my once plain wood framed mirror.

Before chevron mirror

spray painted chevron mirror

after chevron mirror

Mason Hair Jar

Materials:

Mason jar, old spaghetti jar or salsa jar

Dresser pull

Fine grit sandpaper

Spray paint (optional)

If you are like me, I go through 10 or more Goody Elastics a week. I needed to find a way to better control my hair thingamajiggas. Between my daughter and I, I would lose tons of bobby pins, clips and Goody Elastics all the time. I was watching Nate Berkus a while ago and he had a guest on his show that was taking used spaghetti jars, sanding the tops and screwing an old vintage dresser pull on it and displaying things in the jar. The items being displayed could be anything from small pine cones to buttons. So I decided to do the same thing but use it to help with keeping control of my hair thingamajiggas. It was so easy to do and it helped out so much!!

20130903-013302.jpg

*After sanding the jar lid, I actually spray painted it for a more fun look.

Nia Junkie